Table of Contents
Introduction
Achieving a perfect fit for your window blinds can dramatically elevate your home’s decor and improve its functionality. Small measurement inaccuracies can lead to blinds that are either too tight or too loose, making them difficult to operate or unattractive. That’s why knowing precisely how to measure your windows is a crucial first step before purchasing new blinds. With careful planning and the right approach, you can ensure an ideal fit that enhances every room. To get started, you might consider working with local professionals and expert Hunter Douglas dealers in Spokane for advice and product recommendations tailored to your home’s needs. Accurate measurements not only ensure smooth operation but also help maximize energy efficiency by reducing drafts and light gaps. Additionally, properly sized blinds contribute to a polished, cohesive look that complements your interior design.
Understanding Mounting Options
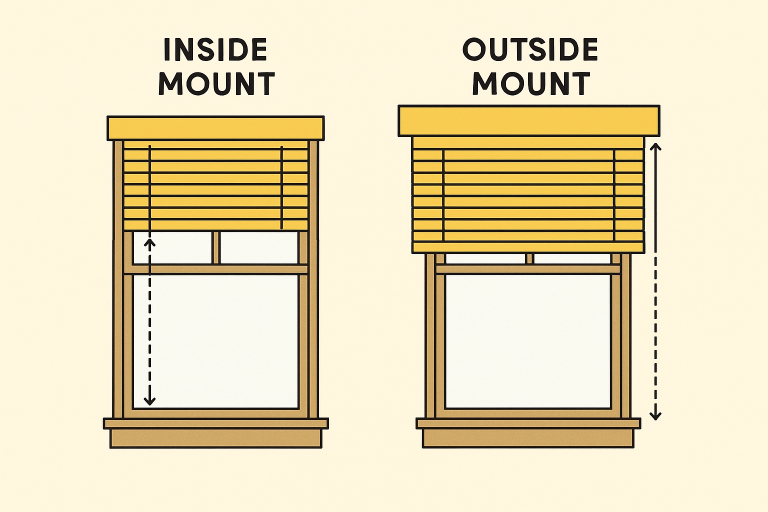
The first decision you need to make before measuring is selecting the type of mount for your blinds. This choice greatly impacts how your blinds look and function. There are two popular mounting options every homeowner should consider:
- Inside Mount: This approach places the blinds within the window frame. It offers a refined, minimalistic appearance and is perfect if your window frames are visually appealing and you want to highlight them. Inside mounting is best suited for windows that have sufficient depth to support the blind hardware.
- Outside Mount: In this style, blinds are fixed on the wall or window molding outside the actual window frame. This method is optimal for increasing privacy or blocking out more light, especially when the window recess is too shallow or there are obstructions inside the frame.
Deciding which mounting style best suits your home is essential before taking any measurements.
Tools You’ll Need
Start your project by assembling all the necessary tools. Having the right kit ensures that every measurement is reliable and that installation will go smoothly. Gather the following items:
- Steel Tape Measure: Always choose a sturdy steel tape measure for exact results, avoiding the potential stretch of cloth tape measures.
- Pencil and Notepad: Keep these on hand for jotting down all measurements and any other installation notes.
- Step Stool or Ladder: These help you reach tall windows or high frames comfortably and safely.
- Level: For particularly large or wide windows, a level keeps your tape measure straight, preventing skewed measurements.
Measuring for Inside Mount Blinds
If you have opted for inside-mounted blinds, precision is key, as the blinds need to fit snugly within the frame. Follow these steps:
- Width Measurement: Carefully measure the exact width at three points on the window: across the top, the middle, and the bottom. Use the smallest of these widths in your blind selection. This accounts for any variations caused by uneven window frames.
- Height Measurement: Measure the window’s height at the left, center, and right sides. Record the largest measurement, ensuring your blinds cover the full length of the opening and leave no gaps.
- Depth Measurement: Many blinds require a specific minimum depth for inside mounts. Measure from the windowpane to the edge of the frame. Compare this to your chosen manufacturer’s minimum depth requirements to avoid compatibility issues.
Always double-check each measurement and record the results to the nearest 1/8 inch, never rounding up or down. Accuracy here will prevent headaches later on.
Measuring for Outside Mount Blinds
For outside-mount blinds, measurements determine how completely your blinds cover the window and minimize light gaps. For best results, follow these steps:
- Width Measurement: Decide how far you want the blinds to extend beyond the window frame, typically 3 inches on each side for full light control. Measure the total distance across from one end of the desired coverage to the other.
- Height Measurement: Measure from the top where you will mount the headrail (typically about 3 inches above the window frame) to your desired stop point. This can be right at the window sill or below, depending on your coverage or style preferences.
By extending outside-mounted blinds above and beyond the window frame, you block out unwanted light and achieve an impressive, custom look.
Common Mistakes to Avoid
Even seasoned DIYers occasionally make errors when measuring for blinds. To prevent frustration and extra costs, watch out for these typical pitfalls:
- Measuring Only Once: Get into the habit of measuring twice, first for your records, then again to verify accuracy before ordering anything.
- Ignore Obstructions: Always check for handles, locks, alarm sensors, or any other objects attached to or near the window that might interfere with the movement or installation of the blinds.
- Rounding Measurements: Never round your numbers up or down. Even a difference of 1/8 inch can impact how well the blinds fit and operate.
Additional Tips for Accurate Measurements
- Use a Level: Especially in older homes, frames may not be perfectly upright. Using a level prevents crooked lines that could skew your results.
- Measure Each Window Individually: Windows that appear to be identical are often not, due to settling or minor construction variances. Take separate measurements for each.
- Consult Manufacturer Guidelines: Each blinds manufacturer may have specific requirements. Carefully review all instructions to ensure your measurements align with their standards and avoid unintended sizing mistakes.
Final Thoughts
Taking the time to measure accurately ensures your blinds are both beautiful and effective, fitting perfectly to elevate the style and privacy of your space. Following the correct procedures for your preferred mounting style minimizes installation issues and maximizes performance. With these steps and tips, you can shop for window treatments confidently, knowing that your results will look stunning for years to come.